Showing posts with label DIY Projects. Show all posts

5 Home Cleaning Tools you MUST HAVE!

Since my husband brings home the bacon (that money honey!); I took the role of all the home responsibility. Which is alright in my book, I enjoy cleaning and I enjoy having a solid system in place at home. With my Hubby and I preparing to move from Condo-life to a front pourch and fenced in yard life; I decided today I'll break out the 5 Home Cleaning Tools you MUST HAVE!

Continue reading to hear what my picks are for the 5 Cleaning Tools you MUST HAVE!
* These cleaning tools are PERFECT for anyone and any living situation. From the apartment, townhome, dorm room, or a house!


1. Swifter Mop Collection
The entire Swifter Collection is in for the win. From the duster with the extending handle to reach high places to the dry mop, and the wet mop. I personally love the wet mop because it works on hardwood, tile, and vinyl flooring. It leaves the floors clean without the bucket of water.


2. Mr Clean Magic Erasers
This is a must for everyone. If you're cleaning to move out of an apartment you can use this to clean any scuffs and get that security deposit back. If you have a Tot that colors on the walls; yes this cleans crayons! If you need help cleaning the tub grim it even works there! Seriously one of these erasers can clean any part of your home.


3. Disinfecting Wipes
These are perfect for cleaning areas quickly and it removes those germs. I especially use these on door handles, remote controllers, and all of Holly's toys. Double points if you get ones that are plant-based and can be tossed in a compost!


4. Rubber Gloves
I'm a firm believer in protecting your skin, especially your hands. I always wear rubber gloves when I do ANY form of cleaning. The chemicals in all cleaning products can be harmful to your skin/delicate areas like fingernails.


5. Dyson Vacuum
I love the Dyson we own (Image above is our vacuum which you can purchase from QVC.com). And I know these vacuums hold up well but can be costly. If you can't afford a Dyson definitely find one with the same qualities like this one (lightweight, easy to empty, powerful suction, etc).

Ultimate Stay-at-home Moms Guide for Activities!


As a fellow Stay-at-Home Mom, I too have hit roadblocks where I'm out of ideas or my child is just 'bored' of playing the same old stuff. Most "SAH Moms" have a budget set for the 'out of the home' activities but (let's be real) we can't go out to the zoo every day! Below I gave my Ultimate Stay-at-Hom Moms guide for activities (home edition).
*I will give a guide to Activities outside the home that are affordable too!*

If you're down to be creative, search around for some normal everyday items and a bold imagination add some of these Ultimate Stay-at-Home Moms Guide for Activites in your daily routine! Before you know it, it'll be bedtime!

*** Tip*** I don't do these every day. In fact a lot of these I have set aside in baskets in the top of Holly's closet. Each Day I grab out 2 or 3 different activities and sometimes I only grab out one depending on the weather and if we have appointments. I do recommend sitting these aside in small zip bags or boxes and even labeling them "Monday, Tuesday, etc". This keeps the activities 'fresh', new and exciting! 

- Color Time
Jumbo construction paper, Toddler size crayons, and some parental supervision. Even grab some giant soft stickers if you want to add texture!

- Make Bubbles
Sink, some bubble bath soap. Grab a bubble wand too! This activity can be done in the bathtub, kitchen sink or containers outside!

- Bathtub Crayons or Paint
I found these amazing crayons and bath paints that Holly really enjoys during bath-time but also I sometimes will let her sit in the tub and paint/color as a activity as well.

- Nursery Rhyme Dance Party
Pandora some Children safe music and bust a few silly dance moves! Your toddler might not dance but she'll get a few laughs.


- Kitchen Items Music Class
Containers, Different size pots, plastic mixing spoons. Make some music! *Don't sit out dangerous kitchen items*

-Sorting Cardboard Box Game
2 larger boxes, some round items, some square items. Use the big boxes and cut the shape (a nice large circle) in the middle of the box. Do the same with the other large box of a square or whatever other shapes you decide to use. Then have your toddler sort out the shapes into the correct box! You can even have your kiddo decorate the boxes too! Once finished keep or properly dispose of the boxes!

- Safe Finger Paint
Use baby food (mashed carrots, mashed peas, ketchup, etc) as finger paint. Grab some jumbo paper or even use a large white paper plate to paint on! This paint is safe so if your child wants to taste the foods she can.

- Story Time
grab some books and read! Even if your little one is busy playing with blocks she is still listening to you and learning new words.

- Big Puzzles
My 19-month-old is learning how to pick up and place big puzzle pieces. Our favorite is her farm puzzle. Even if she doesn't get the pieces back in the puzzle we still pick up the different ones and make the animal sounds.

- Copy Cat
Toddlers are all about copying their best friend (which is you!). So sit and do some simple things like stack a few blocks or tap on your toes and his toes. He'll most likely pick up on the game.

- Dress Up Silly
Grab a few hats, gloves, sunglasses a jacket, whatever you find that is in the coat closets. Sit on the floor and dress silly! As you grab the articles of clothing tell her what they are. She might even try to dress you up!


- Stuff Animal/Doll Challenges
A fun thing to do is grab your child's favorite stuffed animal and have your child help the toy with an activity. For example, Dolly needs help taking a bath (no water, just a large plastic bowl), a small hand towel, and an empty mini travel bottle of soap. I show my little one how to give dolly a bath.

- Backyard Explorer
We spend a lot of time outside in the backyard. We walk around, pick up leaves, sticks, and other unique things and make a collection on the carport. My 19-month-old is too young for slides, sidewalk chalk, and its too cold to get the kiddy pool out. But when once its summer she'll be old enough for her first slide and we can splash in her kiddy pool too!

- Laundry Sorting
When I get a fresh load of laundry out of the dryer I always drop the clothes in the floor and have my little one touch the different items as I hang or fold. She loves to sort the socks into a pile and will even hand me clothes hangers!

-Little Texture Box
Plastic box, tons of different textures (large feather, soft squishy, bumpy shell, Crunchy paper, etc) use the box to let her feel the items.

- Empty Tissue Box Tissues
Empty Tissue Box and Lots of Tissue Paper. The little one can pull out the tissues, feel the textures, and hear the sounds!

I hope this sparks some ideas for you and your tot! If you would like, follow my instagram page! I post daily and even post some of my Toddler Holly and her adventres!  Simply click here to be sent to my Instagram page!

Sweater Pilling + Razor?


This post is perfect for if you noticed your Ugly Christmas sweater has some pilling and need a quick fix. (Of course this is for anytime of the year if you notice your clothes is having some pilling issues!!!!).

There’s very few options of repair and some can be costly.
1. Take the sweater to the cleaners and see if they will fix it for you at a price.
2. Purchase a Fabric Shaver (FYI: I’ve had the WORST luck wit this. I’ve purchased 3 in one year because the blades break!).
3. The “Old Wives Tale” use a simple razor.

Since many of us might be in a rush and the cleaners is something you have to give time.
The Fabric Shaver can work but  if you’re in a rush - like at a hotel - this wont work.
So we gotta try the Razor..... Scary right? Taking a razor you use to shave to... Repair your pilling garment..?

Today I decided I will test this “Wives Tale” to see if it actually works! I’ll have photos below.


Results: YES. This shockingly does work.
My tips:
- Do the sleeves first and to shave towards you in small groups while holding the garment down with your other hand.
- Use a very simple 3 blade razor (not a fancy one or electric razor); this style of razor can be purchased at a drug store or if you were at a hotel they would have these available at the front desk.
- Do not wet the razor.
- Do not use the razor on your skin before or afterwards!!!!!!!
- For me to do my entire Cardigan inside - out it took about 20 minutes because I wanted to find a good system and was wanting to be extra careful with the detailing within the sweater.


I hope this quick and simple post will help anyone who is in a garment pilling crisis!
Best,
Brittney “Pomp and Palms"

Christmas Sugar Cookie Recipe!

Happy Christmas Everyone! Like promised, I wanted to give my Christmas Cookie Recipe for anyone who wants to make beautiful cookies the traditional way. I also have directions on how to make boarder icing and flood icing for the decorating! Of course you can use other decorations like sprinkles, gummy pieces, chocolate chips, and gold flakes to make your cookies unique to your liking.
Enjoy!

Best,
Brittney “Pomp and Palms"


Christmas Sugar Cookie Recipe
Ingredients:
1 cup granulated white sugar
1 cup butter, softened
1 teaspoon vanilla extract
1/2 teaspoon almond extract
1 egg
3 cups all purpose flour
2 teaspoons baking powder

Directions:
1. Preheat oven to 350 degrees F
2. Cream the butter and sugar with a mixer 
3. Beat in the egg, vanilla extract and almond extract
4. In a separate bowl, combine the baking powder and flour. Add this mixture a little at a time to the wet ingredients (keep mixing while you are adding it in). If the dough becomes too stiff for your mixer, you can finish kneading the dough by hand. 
5. Divide the dough into two batches. Roll the dough onto floured parchment paper, but be sure not to roll it too thin! The dough should be 1/4 inch thick. 
6. Bake for 6 to 8 minutes, depending on your oven. Let cool completely before decorating.

For the border icing:
  • 1 cup powdered sugar
  • 1/2 teaspoon vanilla or other flavoring extract
  • 2 - 2 1/2 tablespoons milk or water
  • Food coloring (optional)
For flood icing:
  • 1 cup powdered sugar
  • 1/2 teaspoon vanilla or other flavoring extract
  • 2 1/2 - 3 tablespoons milk or water
  • Food coloring (optional)
Tools for the icing:
  • Squeeze bottles - 1 for the border icing and 1 for each color of flood icing
  • Small funnel

Wedding DIY Projects


Weddings on a budget require some creative tricks, a little trip to Hobby Lobby and a tall glass of wine (or beer). AKA: the Wedding DIY projects! You'll be so surprised at how much money you can save if you take a weekend to do some crafting. My goal is to keep my wedding budget as low as possible so I scouted my Pinterest boards for some wedding decor ideas.

Can you DIY for any style of Wedding?
Of course! Glitzy wedding, Rustic wedding, Halloween theme wedding, Beach wedding, etc. I believe all wedding theme/styles have DIY projects. Todays post I will show you all the DIY projects I'm doing for my Seaside Destination Wedding. Many of these projects can be altered to fit any wedding theme/style. And I'm more than happy to give further details if needed!

1. Table Center Pieces.
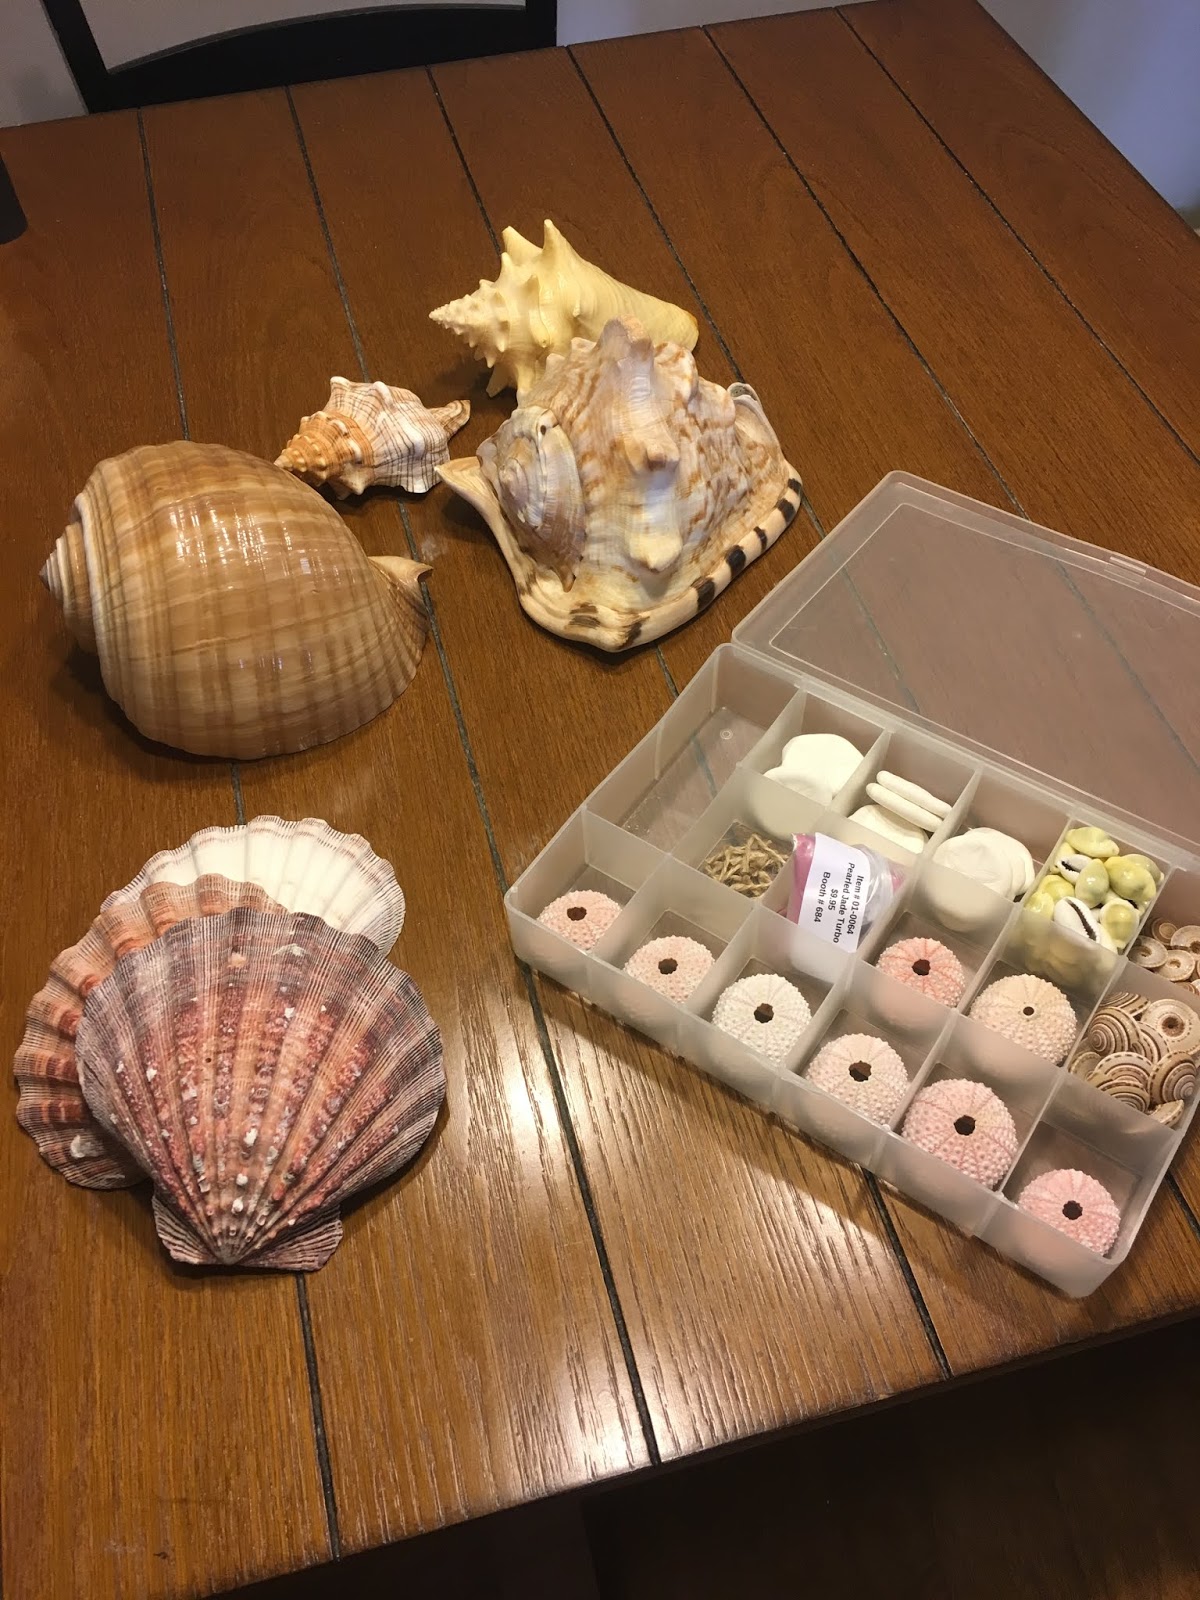
I decided my center pieces will be a table runner, some shells + drift wood, a few flowers, and battery power candles. I was shocked to see the florist was going to charge me over $750 to do 6 tables! With this center piece I designed, I was able to DIY it for under $200 (some of the shells and drift wood I found on the beach!) After my wedding I will post images of the finished product on a special blog post. 


So shells was purchased in bundles. 
I sorted and cleaned some of the shells to get an idea of how I want my arrangements to look.
I have quite a few extra large shells. Here’s some for example. I plan to tissue paper wrap these in a crate.
My super delicate shells like small sand dollars, urchins, and unique rare pieces I used tackle boxes to store. 
2. Guest Sign In Book.
I decided to do a creative Sign In Book. I found this wooden shadow box frame for $5.00. I'm going to glue a few shells on the front and paint inside the shadow box. I bought a pack of wooden hearts for only $3.00 and will have guest write their names on them! I will have images of this after my wedding on a special blog post.

3. Paper Lanterns with Lights.
I found some paper lanterns for $11.90 (for 6 in a pack) and these lovely battery power lights that I'm going to stuff into the lanterns then hang them throughout the pavilion for a romantic and beachy feel.

4. Shell Aisle Runner.
I love Sea Stars. So I had to add them to my ceremony. I plan to have the sea stars line the wedding aisle. Each Sea Star only cost $1-3 dollars each and after the wedding I plan to use them for another project. * I was lucky enough to find Sugar Starfish's to use. These are very rare to find now because of the disease that's killing off the breed. I'm very blessed to have them for my wedding.*


5. Guest Favor Boxes.
I really wanted my guest to leave my Seaside wedding feeling loved and with some memory of the beach. I found these coral boxes for $4.99 (24 per pack), some Sand dollar "Sea Cookies" for $4.00 (a basket with 50-75), and this Jute $3.00. Inside the box I'm putting Sugarfina gummy tester packs $2.50 per pack. I'm going to tie the rope to keep the box secure and then glue a shell on top.

1. Supplies. Sugafina gummy tester, Jute, shells, and 2x2 gift boxes. 
2. Once assembled the box I placed the gummy pack inside and decided on which shells will be insides the box and with on the outside.
3. This is how I visualized which shells will look best. I tied the Jute and then placed the shell options until I was satisfied. 
The finished product! I mixed the shells and did some different looks but each box has 3-4 shells, 3 small square pieces of tissue paper in sea foam blue, and a Sugarfina gummy pack!
6. Cake Topper.
My Cake Topper cost under $5.00! The two wooden beach chairs were only $1.00 each, the paint was on clearance for $0.75 (the bottle had lost some paint), and the 2 shells I purchased in a giant jumbo pack and once I did the math the shells were only $0.75 each. I had some leftover wooden hearts and my sister wrote "Mr" and "Mrs" with some pens she had in a drawer. * The image below is the example I channeled when creating mine (I will post photos after my wedding) These are an Etsy set that's priced at $35.00 while mine is totaled to cost under $5.00* After my wedding I will post images of the finished product on a special blog post.


7. Dust the Sand Off Your Feet Brushes with Jars OR Jars for Silverware
This is a cute idea I found on Pinterest but I plan to make it 3x more budget friendly. I have some mason jars that I found at a thrift store for 5 cents each! I'm going to wrap some of the Jute rope from the other projects around them and glue a shell on the jars. I considered using these jars to hold the brushes in OR for Silverware holders! I found some brushes from dollar tree (obviously they were $1.00) but to add some extra detail I plan to wrap some of the Jute rope. I might even add a shell or two just for fun.

1. Mason Jar, Jute, and Tacky glue. Simply glue the Jute to the jar.
2. Added some beautiful medium- large size shells for the perfect utensil jars!

Other DIY projects
8. Food Trays
My family and I are preparing food trays and using our Sam's Club cards to get the food in bulk. We have some fun different style platters to display the food on and surprisingly a lot of the trays are from the dollar store! We're going to make custom style tooth picks with little shells glued on the tops and have a jar to collect all the shells afterwards for other projects.

9. Rentals
We plan to rent all the chairs, the arbor, and a few tables. My family is pretty amazing and said some friends will help set the reception up in exchange for a beer and snack. For the entire ceremony chairs, arbor, arbor decor it ended up being $600 (this was the most costly part of my wedding)After my wedding I will post images of the finished product on a special blog post.

10. Wedding bouquet
My mom and sister are going to help me create my wedding bouquet. The ceremony vendor is sending photos of what the arbor arrangements look like and we'll mimic the look. We did the math and this should cost no more than $25.00. After my wedding I will post images of the finished product on a special blog post.

After my wedding is over I plan to be 100% authentic with you all and show how much the wedding cost. I will pin point the most expensive parts for any of my brides-to-be that needs a good budget spreadsheet idea. Being straight forward right now... The most expensive part about my Destination Beach Wedding has been the rentals (like I said I will give a spreadsheet of the totals once the Wedding is complete!) 

Traveling Abroad? Here's The Big Three

Maybe it’s “something in the water” but traveling abroad is currently on everyone’s mind. But, before you book that hotel or request that PT...